|
To kick off my series about growing your own food I am going to start with the way I am most familiar. Growing a garden in an average urban back/front yard. Growing your own food on an urban lot comes with its challenges as well as benefits. You obviously lack space that you would get on a larger piece of land but what you gain is easy access to water and immediate proximity to your garden. This walkout your back door kind of access makes it really convenient to do everything. From planting and maintaining to harvesting your produce, having your garden just 10 steps from your door makes it really easy to garden. An example of this is my watering strategy. I wake up Saturday morning, walk outside in my bathrobe and turn on the hose spigot for an hour. Could I do that if my garden was an acre in size or half a mile from my house… Probably not. But enough of my rambling back to the task at hand of laying out a successful method of gardening in a small urban lot. To have a successful garden you need to have the same three things no matter the size of it.
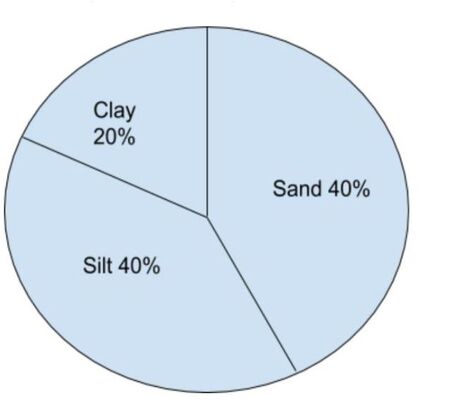
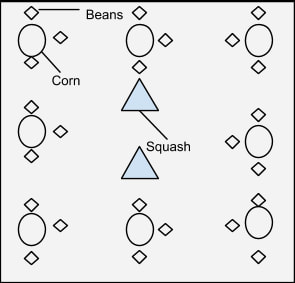
Sun As a gardener in an urban yard you will have to contend with finding enough sun to plant your garden. The sun you want the most is southern and western exposure. This positioning will give you the longest amount of sun and the hottest sun which is best for growing heat-loving things like tomatoes, peppers, and watermelons. Generally, you want to have as much sun as you can but you can work with some shade as well. Shady spots can be used to grow things that like cooler temperatures like beet, radishes, lettuce, and spinach. Soil/Growing Medium The best type of soil for growing a garden is loam soil. Loam soils are composed of the 3 soil components of sand, silt, and clay. You want about equal parts sand and silt with half as much clay as the other components. See the pie chart below for an example of what I mean. Now these ratios are not the perfect loam soil; you can have a range of the three different particles in the soil but you want something close to these numbers. To figure what kind of soil you have you need to conduct a few tests to find out what your soil composition is. I would recommend the Jar Test which can tell you the composition of your soil. If you don't naturally have good soil you can amend it with compost or other organic matter. You can also build your own soil and put it in raised beds over the existing soil. This method has the benefit of getting the perfect soil and it means you can establish a garden without tilling up the ground. Water Access to water, in this case, should be relatively easy since most or all homes have outdoor spigots. What you need to do is set up a watering system to make using that water-efficient and quick. There are two types of watering regimes that will take place in the average garden. You have the springtime seedling establishment that needs frequent lighter watering and established plants that need water only once maybe twice a week. Broadcast Sprinklers Perhaps the most common type of sprinkler out there in the world they are very effective as doing the light even waterings but they can be poor at the deep watering needed later in the summer. You can get deep watering from them but they have to run for a long period and they can waste a lot of water in the process. To cut down on wasted water make sure to adjust the spray to only go where you want it and water in the mornings when it is cooler and less likely to evaporate. In my personal garden I use Rain Bird Rotor sprinklers. They work the best for my long narrow garden setup because I can join them together in a series to cover the whole garden. Soaker Hoses/Drip Irrigation Soaker hoses are good for things that radiate out from one fixed location like vining crops or other bush type plants. They let you put water right at the base of the plant and get a deep soaking in less time than a broadcast sprinkler. They don't work the best with dispersed plants like lettuces, spinach, onion, and root crops. These planters are so narrow the soaker hose can water the whole bed without spraying water everywhere Drip Irrigation is similar to soaker hoses in that it can put the water right where you need it. The biggest difference is that it only puts out water where you install emitters instead of along the whole length of the hose. The nice thing about drip irrigation is that it is very water efficient and you can install different types of emitters depending on the watering need. I have used drip irrigation most often on watering pots when set up with a timer to water them every day. So now that I have covered the three things you need to have to grow a garden now I will go over the steps to setting up a garden in a small urban yard. Step 1- Layout the Garden Once you have found where the sun/shade is in your yard, where the water is, and how you will get it to your garden and what type of soil you have you are ready to layout the garden. The best system I have found for a small urban yard is 4 x ? foot beds with walking clearance on all sides. This layout will give you access to all sides of the garden and for the average adult you can reach everywhere in the garden without having to step on the soil inside the boundaries. This is important because anytime you step on your garden soil you are compacting which leads to all sorts of issues you don't want to deal with. Step 2- Till the Ground or Build the Raised Beds. So normally I am against tilling the soil for any reason since it tends to do more harm than good to the soil. But when it comes to establishing a new garden there is no easier or quicker way to deal with the existing vegetation than by tilling it up and breaking up the roots of that vegetation. This will give you a ready to plant relatively weed-free soil to plant your garden into. The other option is to build raised beds over the existing vegetation using wood frames, cement blocks, whole logs whatever you got. Once the frames are built you can then fill them with the soil medium of your choice and you are ready to plant. When doing this it is a good idea to lay down a biodegradable weed barrier like cardboard, or thick paper to smother the grass under your new soil. This will greatly reduce the weeding you have to do as the year rolls on. Step 3- Develop a planting plan Now in most places in the world there is enough time in the growing year to get at least 2 harvests of certain crops in your garden. For example you can plant beets in early spring (think April) harvest them by midsummer and plant another crop to be harvested in the fall. Another option is to follow a short cool-season crop like radishes with a crop that can be planted laters like beans. Most radishes can be planted early in the spring and most beans can wait till June or even July before being planted. Growing two crops in the same spot but at different times can double the harvest you get from your garden. Another option is to utilize company planting and grow crops that help each other at the same time. A classic example of this is the Three Sisters system that can grow 3 crops in the same space. See the diagram below for an example of what I mean. The Three Sisters grow pole beans, vining plants, and corn in the same space by taking advantage of the growth pattern of each plant. The corn grows tall and straight which provides support for the poles bean. The pole beans are nitrogen fixers which means they take nitrogen from the atmosphere and put it in the soil in a form that can be used by plants and the vining plants cover the soil keeping it cooler and less weedy which means less work for you.
Step 4- Plant seeds and water Now that the plan is in place the beds are prepared, you can finally plant your first seeds. Make sure to follow the planting directions on the seed packets when they say a ⅛ of an inch deep that is what they mean. Too deep and it won't germinate right too shallow and the same thing will happen for different reasons. For watering you want to keep the soil surface moist but not flooded. This is where broadcast sprinklers work well because they coat the entire soil surface with the amount you need with 10-20 minutes of watering. This might have to happen every day or every other day depending on your climate and rainfall patterns. Step 5- Plan for harvest. The seeds are in the ground and the hard part is done right… Wrong… Now that stuff is growing you need to figure out what you are going to do with all of it. Obviously a good chunk will be eaten fresh but unless you have a large family or a really small garden you won’t eat everything that grows fresh off the vine. So you need to figure out what you will do with the extra. You basically have 3 options,
Step 6- Put the garden to sleep When the growing season is done you should cover the bare garden soil with mulch of some sort. This mulch provides an insulative blanket that protects and feeds the soil organisms that make your garden so fruitful. I use tree leaf mulch currently but you can use old straw, hay, pine needle, wood chips, or whatever organic matter you can get your hands on.
0 Comments
Leave a Reply. |
AuthorHello my name is Josh Larson and I am the creator of the Green Living Library. Here on the blog you will find updates to content found in the Green Living Library as well as stories from those living the sustainable life already. Archives
December 2021
Categories
All
|

